Recently we have migrated our repository from Serena
PVCS to
SVN. Here the configuration details I used to configure Subversion(
SVN) on windows 2003 server.
SVN (Tigris.org) got pretty cool
exe file (
Svn1ClickSetup-1.3.3.exe) which will include all it's necessary software's in a single bundle namely the
software's are Subversion,
SVNService and Tortoise
SVN client. We just need to keep on clicking next and verify the installation location by
defualt it points to C:\Pr0gram Files\subversion.
Things To Do:- Download the latest version of Svn1ClickSetup-1.3.3.exe from http://svn1clicksetup.tigris.org/.
- Double click on Svn1ClickSetup-1.3.3.exe and it initialize installation process just keep looking at installation window and keep hitting on next button all the way out to finish set up process.
- Svn1ClickSetup-1.3.3.exe will install Subversion command line tool in C:\Program File\Subversion\ and say Next now subversion will automatically pickup Editor which is Notepad.exe leave it as it is if you want you can change it to text pad or Edit plus what ever you like and say Next now it is going to create Repository (Here is the place all your work gonna save) by default it points to C:\svnrepos (if you want to change you can change it, I changed it and I created like E:\svn_repository) and say Next (this is a bit important stuff here we are going to deal with Authentication) now it points a window asking user name and password this is nothing but your admin credentials I have given as admin/sirish and say Next now it will prompts window asking project name give anything you like or your project name (testproject) and say Next now it is going install SVN client called TortoiseSVN (TSVN) and say Next this will install TSVN and it prompts a window asking Restart your system to complete installation. Just choose Restart and say Ok this will restart your System.
Now you are pretty much done with
SVN configuration on just mouse clicks see how easy it is :-) Now we see how to check-in and check-out a project to
SVN using
TSVN Client.
Just give right click on desktop you see the
TSVN options as mouse short cuts something like,
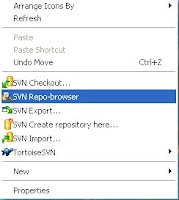
Now open
SVN Repo-Browser for this choose
SVN Repo-browser option on mouse right click and it will ask for URL of the repository provide URL like below,
http://localhost/ or
http://127.0.0.1/
Subversion will open project(s) window something like below where you see the project you created while installing(
testproject) (I changed it to
FirstProject)

All the folders under
FirstProject are empty.
FirstProject will have 3
sub folders called branches, tags, trunk. generally trunk will hold development version of the code so go ahead and drag and drop your project folder inside this trunk or you can add the project by right-click and
Add Folder option but drag and drop is
cool thing to do
.
Once you drag and drop your project folder it will open up a
pop up window asking enter log message so enter something you like (always write clear message saying what you gonna check-in)

So you are done with check-in project into Subversion. Let's go and check-out the same project.
create a folder on desktop with same name of the project (just for
consistency) and then check out the project. Right click on the folder you just created and select Check-out.


Then subversion open up a window showing Repository URL and check-out location just make sure they are right ones and say
ok.

It will download project into local directory. Then try to modify some files and check them back to repository.
Configuring Users (Access Rights on SVN)
Now we need to edit multiple files to configure Users, User Rights and to provide restriction to SVN at group level by creating user groups something like Developers, Testers.
To do so by default SVN got it's won user configuration file. So open
E:\svn_repository\conf directory under we find 3 files namely,
- authz
- passwd
- svnserve.conf
Edit
svnserve.conf and do the following changes.
- uncomment password-db = passwd so SVN will pickup users from passwd file.
- uncomment anon-access and update anon-access = none.
- uncomment auth-access and update auth-access = write.
Now edit
passwd file and add user name and passwords something like below,
[users]
admin=India@123
sirishg=sirishg
david=david
Now we added 3 users for SVN and we need to create groups and provide access on project level. Some people will access some projects only. If user is not assigned to any project he can't able to access the project.
Now edit
authz and create a group and provide access at project level.
[groups]
development_group = sirishg,david
admin_group=admin
I have created two groups called development_group and admin_group and I assigned users to the groups. Remember all the users added in the groups should be declared in
passwd file.
Now providing access to all the users to just see the repository. The following wild card entry will make every user can be able to see all the project but he/she can't be able to access the project unless he/she assigned to that project.
[/]
* = r
[/testproject/]
@development_group = rw
@admin_group = ''"
About command means for testproject development_group have read and write access and admin_group don't have any rights. The same way you can provide access to other projects too.
authz Conf Files look like,[/]
* = r
[/testproject/]
@development_group = rw
@admin_group = ''"
passwd Conf Files look like,[users]
admin=India@123
sirishg=sirishg
david=david
svnserve.conf Files look like,[general]
anon-access=none
auth-access=write
password-db=passwd
So now you can try accessing your repository from repobrowser Now SVN will prompt you user name and password.


